

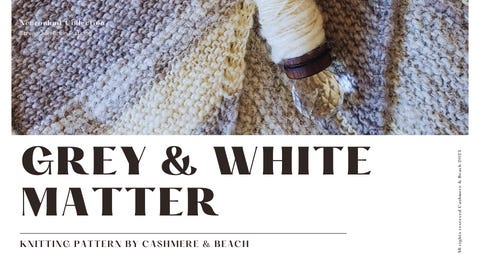
Grey and White Matter Pattern
Grey and White Matter Pattern
For this edition of the Neuronknit Series, I'm going to talk about how the positive effects of knitting and spinning your own yarn increase recovery after a traumatic brain injury.

For this edition of the Neuronknit Series, I'm going to talk about how the positive effects of knitting and spinning your own yarn increase recovery after a traumatic brain injury. Specifically exploring the idea of "how soon to start daily activities or exercising etc." after a head injury.
Traumatic brain injuries, ranging from minor cognitive delays to debilitating and life-threatening symptoms such as seizures and coma, can follow the victim for years after the injury. Recovery time can take anywhere from a few weeks to ten years.
So that takes me to the building blocks of the brain, which are our neuron cells transmitting information to our body. Neurons contain a dendrite, a soma, and an axon. Some axons are covered with a fatty substance known as the myelin sheath, which surrounds the axon, acting as an insulator and flowing faster transmission of electrical signal.
That fatty tissue is Grey matter, an essential type of tissue in your brain and spinal cord. It plays a significant role in mental functions, memory, emotions and movement.
The grey matter has a large number of neurons present, which allows it to process information and release new information through axon signaling found in the white matter.
White matter is found in the deeper tissues of the brain (subcortical). Myelin gives the white matter its color.
In the most general sense, the gray matter of the brain facilitates information processing, and the white matter facilitates information transfer; both are critical for efficient operation of the neural networks responsible for a specific mental domain.
I targeted Neuroplasticity strengthening right away....
It is defined as the ability of the nervous system to change its activity in response to intrinsic or extrinsic stimuli by reorganizing its structure, functions, or connections after injuries, such as a stroke or traumatic brain injury (TBI).
I also targeted the Blood Brain Barrier...
The blood-brain barrier (BBB) is the specialized system of brain microvascular endothelial cells (BMVEC) that shields the brain from toxic substances in the blood, supplies brain tissues with nutrients, and filters harmful compounds from the brain back to the bloodstream.
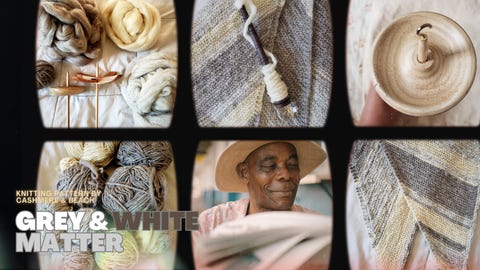
Which leads me to the knitting pattern I created and want to share with everyone. The gentle and consistent knit stitch is meditative and relaxing. The rotation of the stripe pattern is inputting information to your neurons. The increase rows in the pattern shows the growth. The spinning and making yarn is an added level of patience needed to recover from injury. The i-cord bind off detail is the strength you created for longevity.
Triangle Shawl
This pattern is beginner friendly. It is the original and most used stitch, the "knit stitch", which creates a beautiful soft fabric. Repeating this stitch is relaxing and meditative. The stipes in the pattern is designed to create repetition while adding new information to your neurons.
I introduced yarn spinning to this process to level up! The practice of spinning yarn has some of the same effects as knitting and creates a garment that is truly unique.
The shape of the triangle is to start at one place and grow as you develop the shawl. I also added the i-cord bind off to signify a strong detailed edge that will forever hold it's shape.
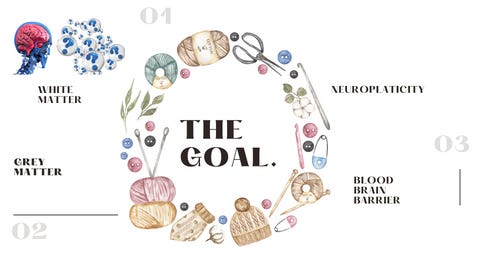
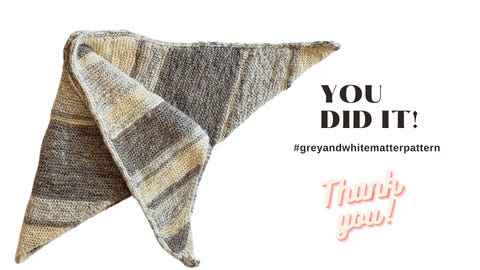
The Goal.
Human wellbeing. I designed this pattern for neurological enhancement and prove that the knitting journey is healing and activates your brain. Also you get a reward at the end, a completed item you created yourself.
Now that's winning!
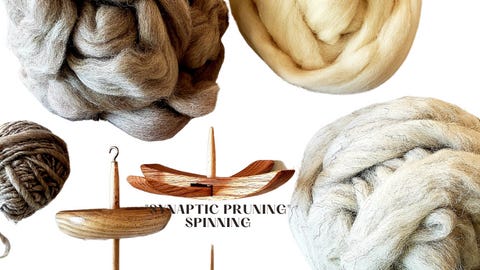
"Synaptic Pruning" spinning
synaptic pruning is an important part of growth and development. Old, unused synapses are lost during pruning. This, in turn, makes room for new synapses to develop from the experiences that you have the next day.
The process of spinning yarn is relaxing and meditative. It has nothing to do with perfection and everything to do with unique-ness.
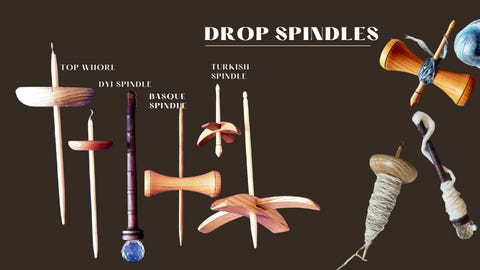
About drop spindles
A drop spindle is a hand held tool that allows you to make yarn from raw fiber. there are many types of spindles and many ways to use them.
top whorl
The top whorl is probably the moest commenly used spindle. It has the weight at the top of the shaft and created yarn is wound onto the bottom of the whorl.
Turkish spindle
The turkish spindle is a bottom whorl spindle with a unique crossbar at the bottom of the shaft. The yarn is looped onto the top of the whorl for spinning and the created yarn is wound onto the bottom crossbar.
Basque spindle
The basque spindle is a bottom whorl with beautiful cross arm shape. I love to travel with this spindle. It is one of the smoothest spins I've spinned with.
dyi spindle
You can make your own spindle too! The one I made is supported spindle. O used a long piece of wire, one side attached to the diamond shape and the opposite side through a vintage bobbin with the wire folded over to hold the fiber for spinning. It's wound at the bottom of the whorl.
About the wool
Sheep breed and origins
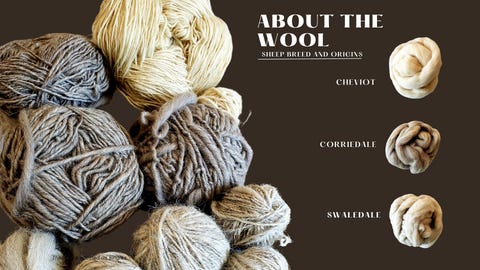
Cheviot
This fleece is from sheep that originated from England and Scotland. The fleece is dense and three dimensional with a crimp like texture and a natural creamy white color. This fiber is an absolute pleasure to spin.
Corriedale
This fleece is from sheep that originated from New Zealand. The fleece is medium length from white, grey and black sheep. Also excellent for spinning.
Swaledale
This fleece is from sheep that originate from England. This fleece is rough and sturdy. It's not only insulating, but will protect from harsh outer elements!
Spinning instructions
You will need at least 8 ounces of fiber of each color
Intro to yarn spinning
For the purpose of this pattern, I will focus on spindle spinning instead of spinning with a machine. There are many types of spindles and I will focus on the "top whorl" spindle. I used qiviut fiber for this project, however you can use any wool, plant or synthetic fiber you want.
Step 1: Pre-draft
Break off a piece of roving about a foot long, and pull gently about 2 to 4 inches at a time to loosen the fiber to the end. Keep gently stretching out the roving until it is at least twice as long as the original length.
Step 2: Attach to spindle
Using a piece of scrap yarn tie a piece about a foot long to the shaft of your spindle, any old knot will do. Bring the leader around the edge of the whorl (many spindles have a handy notch in the edge for this purpose) and under the hook at the top of the spindle shaft.
Before introducing your fiber into the equation, you will give your spindle a (clockwise) spin by twirling the shaft below the whorl and letting it hang from the leader. The spindle keeps going for some time before the twist in the yarn fights back and slows it down.
Step 3: How to manage pre-draft yarn for spinning
Wrap your pre-drafted roving around your wrist. As you spin, you'll unwind the roving from your wrist. or your may throw over your shoulder to keep out of your way.
Step 4: Spinning
give your spindle a good clockwise spin, and let it hang, keeping your hand pinching leader (that has the waste yarn attached) and fiber together. You should notice the fiber twisting onto the leader. Let the leader build up a good amount of twist, then attach the pre-draft roving and allow the twist to twist into the roving. Repeat this process a couple of times.
Step 5: Wind on
Your newly spun yarn will eventually get too long. So you will unhook the yarn and wind all but 10' or so around the shaft of your spindle, then bring it around the whorl and into the hook again. Repeat this process until you have spinned all of your roving.
Knitting Instructions
US needle size 7
Yardage needed per color is about 400 yards each
Remember,
Every right side (RS) is an increase row!
Every increase is a yarn over (yo), 2 stitches before end of row (EOR)
cast on/ set up
c/o 6 sts
(set up rows)
R1: (RS) K to last sts, slip last sts purlwise
R2: (WS) k across, slip last sts purlwise
1st Chart
R3: (RS) K 3 sts, yo, k2, slip last sts
R4: (WS) k across, slip last sts purlwise
Repeat 5 more times and continue with chart #1
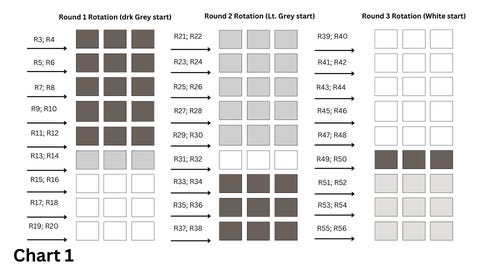
2nd Chart
Chart #2 introduce one (RS) and (WS) white stripe after each color change.
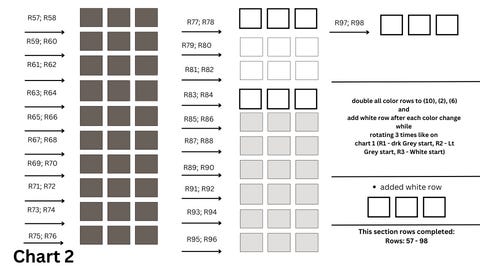
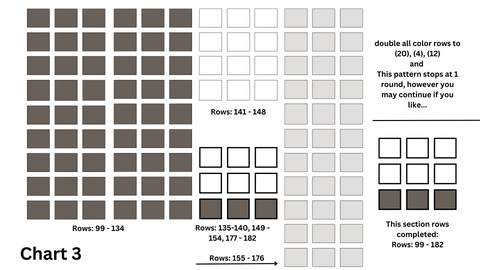
3rd Chart
Chart #3 introduce two (RS) and (WS) white stripe AND one grey (RS) and (WS) stripe after each color change.
The Final Details
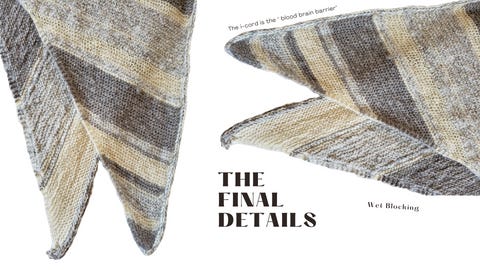
I-cord bind off instructions
The i-cord is the " blood brain barrier"
R1: Start KFB, by placing STS onto the working needle. Repeat 2 more times for a total of 3 additional STS.
iR2: K2, K2TOG through the back loop, place 3 knitted STS back onto the working needle
Repeat R1-2 until bind off is complete
Wet Blocking
Gently place the scarf under water. While it's under water, gently removing air bubbles by pressing scarf into water. Let it sit for 10 minutes, drain the water and place on towel to remove access water. lay flat to dry.
Check out more from the Neuronknit Series
Donate here to help keep patterns free Paypal.me/cashmereandbeach
If you think you may have a head injury, but not sure? Take this quiz

cashmereandbeach@gmail.com
youtube.com/@cashmerebeach4921